HealPay FAQs
This article addresses frequently-asked questions from HealPay users. If you have a question that isn’t answered here, you can contact your biller or HealPay support.
What is HealPay?
HealPay is a payment software provider that billers and organizations use to allow fast payments and donations.
How do I get started?
Use the link provided by your biller or organization to navigate to the login page. From there, enter your email address and a unique password and click the “Login or Register” button. On the registration form, agree to the Privacy Policy and Terms & Conditions and click “Register.”
You will be prompted to verify your email. Click the link in the dialog to be sent an verification email. Click the link in this email to complete the verification process.
NOTE: Some billers or organizations may allow guest payments and donations. If this option is available, you can complete a transaction without registering. It may take longer for your biller to apply a guest payment to your account.
How do I reset my password?
After signing into your account, click the circular icon in the navigation bar and select ‘Account Settings’ in the dropdown. On the Account Settings page, enter a new password in the ‘Change Password’ field and click ‘Save Changes’.
If you have forgotten your password, click the “Forgot Password” link on the login screen to reset your password.
What are the password guidelines?
We’ve created password guidelines to make your HealPay account more secure. Passwords:
— Must have 8 characters or more
— Cannot include your email address
— Cannot include prohibited words
— Cannot contain repetitions
Who will have access to my account?
Only you. We will never ask you for your password via email or other communications.
How do I link my bill?
You must create and log into your HealPay account to link a bill. If it’s your first time logging in, you will automatically start out on the “Link Account” page. Enter the account number found on the bill or invoice from your biller. Answer any verification questions to confirm your identity.
If you already have an account linked, you can click the “Link another Account” button on the Overview page pictured below to link an additional account.
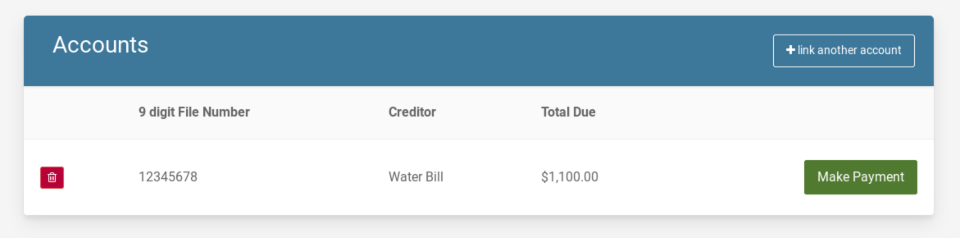
NOTE: Some billers or organizations may allow guest payments and donations. If this option is available, you can complete a transaction without registering. It may take longer for your biller to apply a guest payment to your account.
Will I get a receipt?
After completing a transaction, we’ll display a transaction confirmation page with the option to print a receipt for your records. You’ll also receive a payment confirmation to the email address we have on file.
Can I save my payment information for the future?
Yes, certain billers may allow you to save your payment information to your Wallet for faster future payments or donations. You’ll see the option to save your payment details on the Payment Information page of the payment process.
You must register and verify your email for this feature to be available.
If you don’t see the option to save your payment information, contact your biller or organization to request this feature.
How do I change my billing information?
You can change your saved billing information by logging into your account and selecting “Account Settings,” which is found by clicking the circular icon in the navigation bar.
Once you’re on the Account Settings page, enter your new billing information and click “Save Changes.”
How can I see a history of my payments/donations?
Click on the circle icon in the upper right hand corner of the page and select the “Payment/Donation History” option.
If you don’t see the option to view your history, contact your biller or organization to request this feature.
Can I set up a recurring payment/donation plan?
You can set up a recurring payment or donation to avoid missed payments or make ongoing contributions.
When entering credit/debit card or eCheck information on the payment/donation page, select the “Recurring Payments” checkbox to set your preferred options.
If you don’t see the option to make a recurring payment, contact your biller or organization to request this feature.
How do I cancel a recurring payment/donation plan?
Cancel a recurring payment or donation anytime by logging into your account. Select the circle icon in the upper right hand corner of the page and select the “Recurring Payments” or “Recurring Donations” option. On the next page, click “Disable” on the payment/donation schedule that you would like to cancel.
If you don’t see the option to cancel your recurring payment, contact your biller or organization to request this feature.
Can I cancel a payment I’ve made?
Contact your biller or organization if you need to cancel a payment.
Who should I contact if a transaction is declined?
Contact your bank or credit card issuer to find out why a transaction has been declined.
How do I cancel my account?
After signing into your account, click the circular icon in the navigation bar and select ‘Account Settings’ in the dropdown. On the Account Settings page, scroll to the bottom, read the disclaimer, mark the confirmation checkbox and select “Delete My HealPay Account”.
NOTE: Deleting your account will not cancel any payment plan arrangements you may have set up with a merchant.